Thursday, May 31, 2018

Making a lamp post, part 3

My 3D printed lamp reflectors arrived today. They seem to have printed as they should.

The first thing to do was to check that they would fit with the rest of the assembly as intended. To the right in the picture below is a reflector as delivered. To the left is a reflector where I have drilled a hole through it for the electrical wires, attached a 1 millimeter brass tube to the hole and threaded two magnet (enamel) wires through the whole thing.


So far everything looks good.

In front of the left reflector in the picture above is the 2323 (23x23 mm) SMD LED that I will use to light the lamp post. It is the same type of LED as I used to light the telephone booth.

Thursday, May 24, 2018

Making a lamp post, part 2

The reflector of the lamp post model I am trying to replicate had quite a peculiar shape, as seen in the previous post. Like this (since I guess you do not remember or have not seen that post):


I could not figure out how to convincingly, and manually, create that form from plastic, metal or any other material. From brass using a lathe perhaps, but I do not have a lathe and would not know how to properly handle one, so I decided to once more pursue the path of 3D printing. After some struggling with the Web based 3D modelling tool I am using (Tinkercad) I managed to create a model that looks like this when uploaded to the 3D printing service (Shapeways):


I am eager to get the result delivered and see what it looks like in reality. My intention is to place a SMD LED inside it, and make the post actually work.


Wednesday, May 23, 2018

Making a lamp post, part 1

The last item on the diorama is a lamp post. And as all other things on the diorama, this one shall be as I remember it from my childhood in a Stockholm suburb. I scouted that neighbourhood for posts remaining from that period, but they have all been replaced. I did however manage to find some photos on the web, like this one.


Note the distinct shape of the lower part of the post. It is that part I was most eager to get right. But with only pictures like this it was hard to get the dimensions correct. But then one day I happened to, by pure chance, stumble upon two lamp posts closer to the city centre, where only the upper parts had been replaced, and the lower parts remained in their original form. Like this.


Not in a very good shape, and not in the color I remember, but now I could get decent measures.

I have so far modelled the lower part of the post, using brass tubes of different dimensions, and styrene strips wrapped around the tubes.


So far so good. I'm now waiting for smaller dimension tubes for the upper parts.


Tuesday, May 22, 2018

Making a tree, part 3

Before adding the leaves the tree needed some finer branches. So I sprinkled on some static grass fibres. First 6 mm fibres and then 3 mm fibres. I used ordinary hairspray to make the fibres stick. The picture below shows the tree after this step. The stem is covered with a piece of paper to avoid any hairspray or fibres to end up on it.


The next and last step was to add the leaves. I used Noch Leaves, Light Green (#07142). Once again, hairspray was used to "glue" the leaves to the tree. Here is the final result.


Monday, May 21, 2018

Making a tree, part 2

Tree making continues. I built up the stem using some modelling clay. The branches got some modelling paste to make the wires less obvious.

Then I spray painted (rattle cans) the whole thing. First gray and then with some black. Last both the stem and the branches got a brownish wash.


Next I will add even smaller branches in the form of static grass fibres, and last the leaves clinging to the fibres.

Sunday, May 20, 2018

Making a tree, part 1

I have started to make the tree that will be growing to the right of the telephone booth. I am making it as a wire armature tree, i.e. making the branches using twisted wires. I am using a wood skewer for the core of the stem, creating a straight and fairly well pruned tree. This since it sits in an urban setting, and not grows freely in the wilderness.

Here is a picture of the progress so far.


Wednesday, May 16, 2018

Painting and more building


Painting and weathering of the sidewalk and the street is more or less complete. I have used various colors, mostly Vallejo, to obtain the desired effect. The sidewalk stones are actually more blue than grey. I used Vallejo Intermediate blue (70.903) and Vallejo French Mirage blue (70.900), a tip I got from this video.


I have also started to build the wall that will be positioned along the back of the sidewalk. It is made of a piece of extruded foam, clad with sanding paper to simulate a plastered wall. The wall will be painted is some other color, not yet decided. Along the top there are square pieces of cork that will be painted to simulate stones.


Wednesday, May 9, 2018

The 3D tree grate has arrived

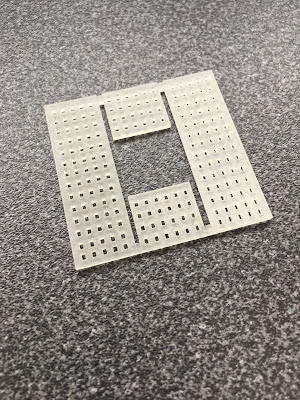
The tree grate has arrived from the 3D printing service (see this post). The print looks like this.


The grate is printed in a plastic material called Frosted Extreme Detail (FXD). I really do not need the fine detailing possible with that material. I could have used the Frosted Ultra Detail (FUD) instead, but the FXD also gives a smoother surface which I wanted.

As you can see my printing includes the concrete parts of the grate only. To make the 3D model simpler I decided to not include the metal framing but to add that later using styrene dimensional strips. The next photo shows just that.


And the completed assembly painted with a grey spray primer.


Stone laying completed

A few days ago the stone/cork laying had progressed this far.


Half of it done, I would say.

And now, finally - the last stone has been laid!


Thursday, May 3, 2018

A concrete tree grate

In urban settings there is almost always some kind of grating around trees (Swedish: trädgaller/markgaller). This helps air and water getting down through the soil. In the place and time I'm modeling the tree grates were made of concrete. I have a fairly good mental picture of what they looked like, but has not managed to find any left in real life. The only thing I found at first was this picture of a grate in bad shape. Poor tree!

(Photo: Örjan Stål)

I found the above photo in a publication from the Stockholm traffic and park administration (Trafikontoret). That in turn led me to a helpful person who told me that the above were the standard grates in the city of Stockholm up to the 1990:s. He also was kind enough to supply me with a plan of such a grate.


Since I did not want to manually cut all those tiny holes, and get them all straight and tidy at the same time, I decided to instead do a 3D print of a grate. Such a print is now awaiting processing at Shapeways. Here is what the model look like. It consists of four different parts, that will be cut apart and fitted into a frame I will build from styrene.


Paving and starting stone laying for real

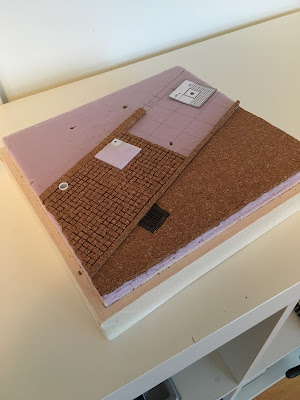
At last, the actual diorama is under way. I have laid out the various elements on the base. In the picture below you can also see the foundation for the telephone booth, the fitting for the lamp post and a paper print representing the grating around the tree. I have also laid the cork that will become the street paving and the curb.


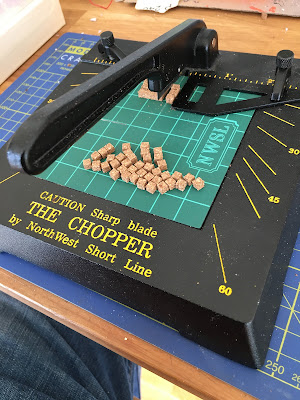
Stone cutting and laying has also commenced. My NorthWest Short Line cutter is indispensable when cutting stones from cork.


Nearly half of the stones are in place.


Building a frame

I have cut the diorama base from foam, and built a wooden frame around it.


The frame is just stained white, and I may actually keep it that way.